Administrator Guide
Admin Panel Overview
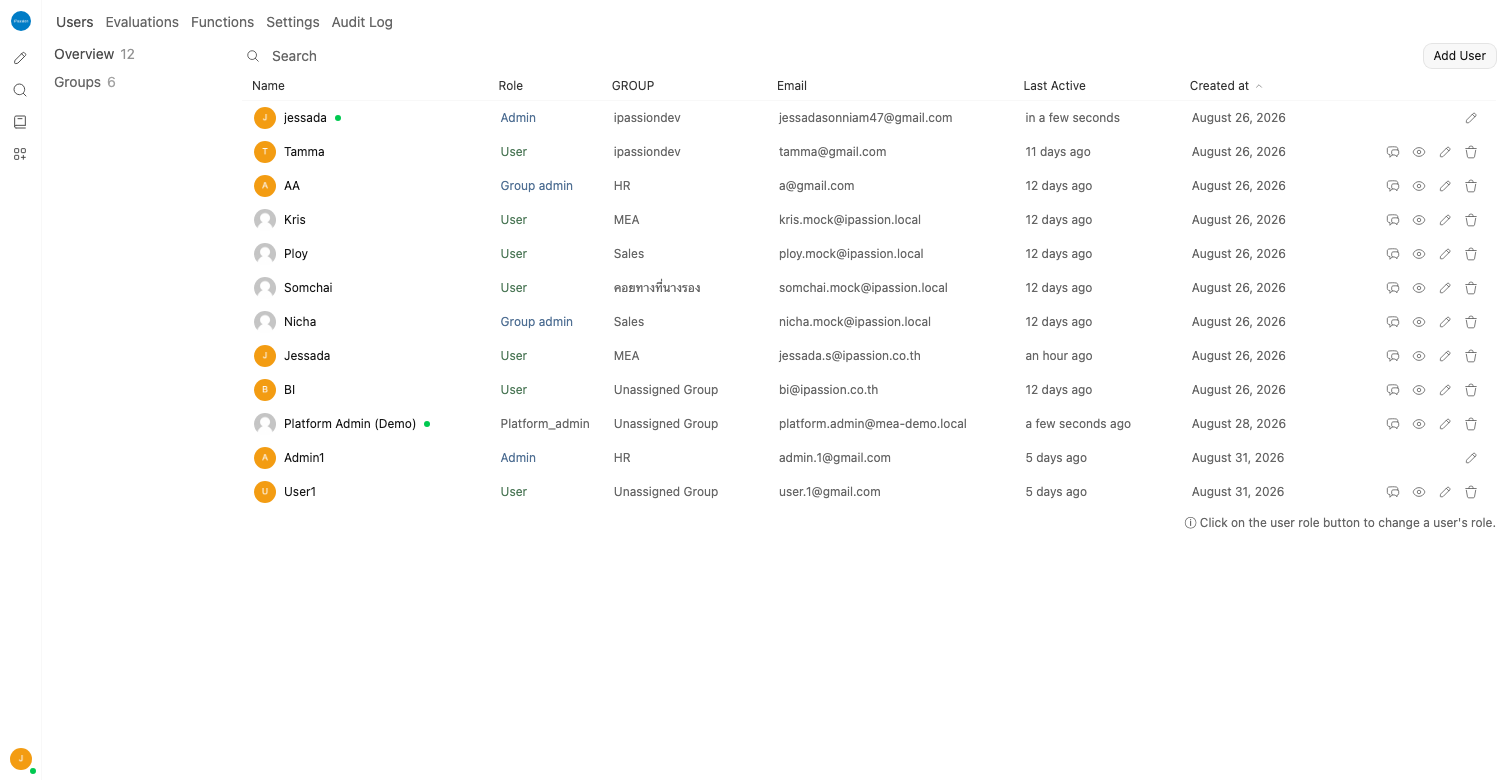
Administrators can access the management interface via the Admin Panel in the left sidebar. The Admin Panel consists of the following main tabs:
- Users (ผู้ใช้): Manage users (Overview) and groups (Groups). Includes sub-tabs for Overview and Groups.
- Evaluation (การประเมิน): Model evaluation and arena mode.
- Functions (ฟังก์ชัน): Manage filter functions (e.g., PII Guardrail).
- Settings (การตั้งค่า): Configure all system settings (with multiple sub-tabs).
- Usage History (ประวัติการใช้งานระบบ): View system-wide usage analytics and statistics.
User Management
Viewing the User List
Navigate to Admin Panel > Users.
The system displays all registered users with the following information:
| Column | Description |
|---|---|
| Name | User's display name |
| Role | Admin, Group Admin, User, or Pending |
| Login email address | |
| Last Active | Timestamp of the user's most recent activity |
| Created | Account creation date |
Adding a New User
- Click Add User at the top right.
- Fill in the required details:
- Name: User's full name.
- Email: Login email (use @company.com format).
- Password: Set an initial password.
- Role: Select Admin or User.
- Click Create.
Editing a User
Click the Edit icon next to the user's name. You can modify the user's name, email, password, or role.
Changing Roles
Users can be assigned one of the following roles:
| Role | Thai Label | Description |
|---|---|---|
| Admin | ผู้ดูแลระบบ | Full access to the Admin Panel and all system settings. |
| Group Admin | ผู้ดูแลแผนก | Department-level administrator. Can manage group members, view group usage, and manage group resources. Assigned by Admin within a group. |
| User | ผู้ใช้ | Standard access. Can chat, use assigned models, and manage personal settings. |
| Pending | รอการอนุมัติ | New signups awaiting admin approval. Cannot use the system until promoted. |
Disabling a User
Click the gear icon next to the user's name and select Disable. Disabled users cannot sign in, but their data (conversations, settings) is preserved. This is preferred over deletion when you need to revoke access temporarily.
Deleting a User
Click the Delete icon next to the user's name. The system will ask for confirmation.
Warning
Deleting a user permanently removes all their conversations and data. Consider disabling the user instead if you may need to restore access later.
Group Management
Purpose
Groups let you organize users by department and control access to models, Knowledge Bases, and AI Agents at the group level.
Creating a New Group
- Navigate to Admin Panel > Users > Groups tab.
- Click + Create New Group.
- Fill in:
- Group Name: e.g., "IT Department", "Finance", "Engineering".
- Description: Describe the group's purpose.
- Add members by searching by name or email.
- Assign the models, Knowledge Bases, and AI Agents this group can access.
- Click Save.
Group Permissions
| Permission | Description |
|---|---|
| Model Access | Which AI models this group can use. |
| Knowledge Base Access | Which Knowledge Bases this group can query. |
| Agent Access | Which AI Agents this group can interact with. |
Group Admin Role (ผู้ดูแลแผนก)
Admin can assign a member within a group as Group Admin (displayed as "ผู้ดูแลแผนก" in the UI). Group Admins can:
- Add or remove members within their group
- View usage reports for group members
- Manage Knowledge Bases owned by the group
Connections
Accessing
Navigate to Admin Panel > Settings > Connections.
Adding a New Connection
- Click + to add a new connection.
- Fill in:
- API Base URL: The AI provider's endpoint URL.
- API Key: Authentication key for the provider.
- Click Save.
The system auto-detects available models from the connected provider.
Supported Providers
iPassion AI Portal supports multiple AI providers simultaneously. Any OpenAI-compatible API can be connected.
| Provider | API Base URL | Notes |
|---|---|---|
| Google Gemini | https://generativelanguage.googleapis.com/v1beta/openai |
Via OpenAI-compatible endpoint. |
| OpenAI | https://api.openai.com/v1 |
GPT-4, GPT-4o, GPT-4.1, etc. |
| OpenRouter | https://openrouter.ai/api/v1 |
Unified gateway -- access OpenAI, Claude, Mistral, and hundreds of other models through a single API key. |
| Ollama (Local) | http://localhost:11434 |
Run open-source models locally. |
| Any OpenAI-compatible API | Varies | Any service exposing the OpenAI API format. |
Anthropic Claude
Anthropic's native API uses x-api-key for authentication instead of Authorization: Bearer. Direct connection is not supported. Use OpenRouter to access Claude models -- add a single OpenRouter connection and all Claude models become available.
Connection Management
Connections are stored as ordered arrays. Do not delete a connection from the beginning or middle of the list -- this causes configuration drift. Use enable: false to disable a connection instead. Adding or removing at the end of the list is safe.
You can add multiple connections from the same or different providers. All detected models appear in the model picker across the system.
Model Management
Accessing
Navigate to Workspace > Models.
Viewing Models
The system displays all models from connected providers along with any custom models you have created.
Creating a Custom Model
Custom models wrap a base model with additional configuration to create a tailored experience for users.
- Click Create a New Model.
- Configure the following:
- Model Name: The display name users will see.
- Model ID: A unique identifier for the model.
- Avatar: Upload an icon or image for the model.
- Base Model: Select the underlying model from your connected providers.
- System Prompt: Set default instructions. Supports dynamic variables (e.g.,
{{USER_NAME}},{{CURRENT_DATE}}). - Knowledge Binding: Link Knowledge Bases that the model should reference.
- Tool Binding: Attach tools and functions the model can call.
- Access Control: Set which users or groups can use this model.
- Click Save.
Example
Create a model named "HR Assistant" using Gemini 2.5 Flash as the base, with a system prompt tailored for HR inquiries, linked to the HR Policy Knowledge Base, and restricted to the HR department group.
Model Actions
For each model, the following actions are available:
| Action | Description |
|---|---|
| Edit | Modify the model's configuration. |
| Hide | Remove the model from the user-facing picker without deleting it. |
| Clone | Duplicate the model to create a variant. |
| Export | Export the model configuration as a file. |
| Share | Share the model with the community or other instances. |
| Delete | Permanently remove the model. |
Visibility and Access Control
- Public: Available to all users in the system.
- Private: Available only to specified users or groups.
Selected Models and Pinned Models
- Selected Models: Define which models appear in the model picker by default. Unselected models are hidden from users.
- Pinned Models: Pin frequently used models so they appear at the top of the picker.
Curated Interface Pattern
A recommended approach is to hide the raw base models from users and expose only custom wrapper models with meaningful names, system prompts, and bound Knowledge Bases. This gives users a cleaner, purpose-driven interface while administrators retain full control over the underlying configuration.
System Settings
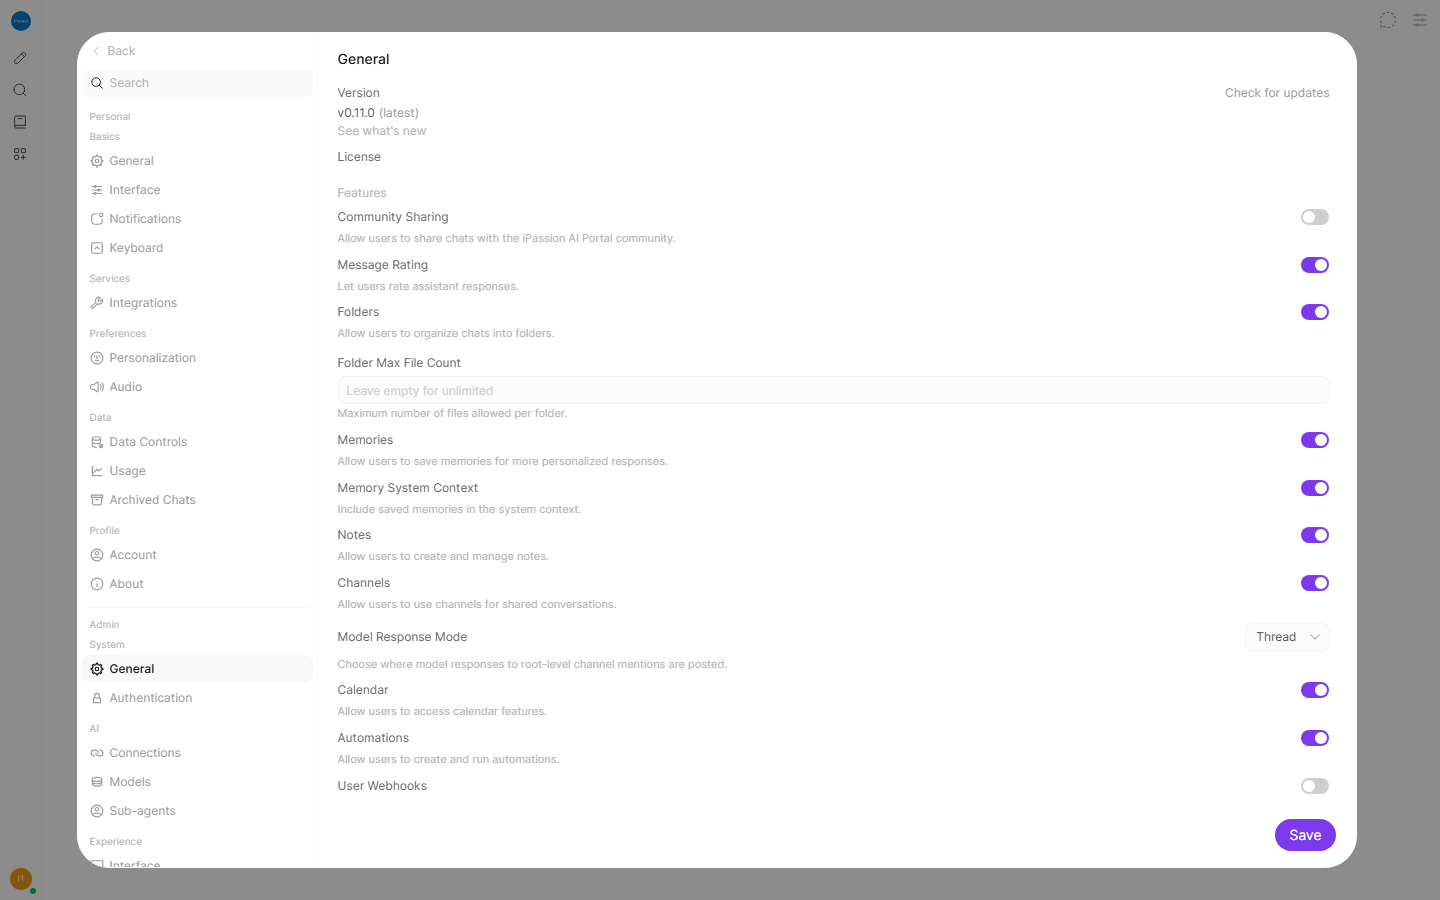
Navigate to Admin Panel > Settings to access the following sub-tabs. The settings are organized into categories:
System
General
| Setting | Description |
|---|---|
| Version | Current system version (v0.11.0). |
| Community Sharing | Enable or disable public conversation sharing. |
| Message Rating | Enable or disable response rating (thumbs up/down). |
| Folders | Enable or disable conversation folder organization for users. |
| Memories | Enable or disable the AI memory feature system-wide. |
| Notes | Enable or disable the notes feature. |
| Channels | Enable or disable team collaboration channels. |
| Calendar | Enable or disable the calendar feature. |
| Automations | Enable or disable event-driven automations. |
| User Webhooks | Allow users to configure their own webhooks. |
| User Status | Show user status indicators in the application. |
| Response Watermark | Append a watermark to AI responses when configured. |
| WebUI URL | Public URL of the system, used for generating links in notifications. |
| Quota Limits | Block API/chat requests when a group reaches 100% of its quota. |
| Usage Alert Threshold | Alert percentage threshold for group quota usage (e.g., 80%). |
Authentication
| Setting | Description |
|---|---|
| Default User Role | Set the default role for new registrations: User (immediate access) or Pending (requires admin approval). |
| Allow Registration | Enable or disable self-registration. When disabled, only admins can create accounts. |
| JWT Expiration | Configure session timeout duration. Users must re-authenticate after this period. |
| SSO / OIDC / LDAP | Configure enterprise identity provider integration (26 settings fields). |
AI
Connections
Configure AI provider connections (API Base URL and API Key). See the Connections section above.
Models
Global model configuration: set default parameters, select which models appear in the picker, and pin frequently used models.
Sub-agents
Configure sub-agent behavior for multi-step reasoning and tool-calling workflows.
Experience
Interface
| Setting | Description |
|---|---|
| Prompt Suggestions | Configure example questions displayed on the home screen to guide new users. |
| Default Models | Set which models are pre-selected for new users or new conversations. |
| Banner | Configure an announcement banner displayed at the top of the screen (e.g., maintenance notices, usage guidelines). |
Identity
Customize the system branding: system name, logo, and visual identity.
Audio
| Setting | Description |
|---|---|
| STT Engine | Select the Speech-to-Text engine (e.g., browser default, Whisper). |
| TTS Engine | Select the Text-to-Speech engine. |
| TTS Voice | Choose the voice used for AI read-aloud responses. |
Images
Configure image generation backends (DALL-E, ComfyUI, Automatic1111, etc.).
Quality
Evaluation
Configure model evaluation settings (Arena Mode, A/B testing).
Analytics
System-wide usage analytics configuration.
Quota
Configure quota limits and usage alert thresholds per group. When enabled, the system blocks API/chat requests when a group reaches 100% of its quota allocation.
Tools
External Connections
Register external tool servers (OpenAPI-compatible) and terminal connections.
Documents
Configure document processing engines for Knowledge Base ingestion (Tika, Docling, etc.).
Web Search
Configure web search providers for grounding AI responses in real-time information.
Code Execution
Configure the code interpreter for running code snippets within chat.
Pipelines
Connect to pipeline servers for multi-step processing workflows.
Data
Database
| Setting | Description |
|---|---|
| Export Database | Export the entire system database for backup or migration. |
| Import Database | Import a previously exported database file to restore data. |
Admin Analytics
Usage History
The Usage History tab in the Admin Panel provides usage analytics to help administrators monitor system health and adoption.
Key metrics include:
- Message Volume: Total messages sent over time, broken down by day, week, or month.
- Token Consumption: Tokens used per model and per user, useful for cost management.
- Cost Tracking: Estimated costs based on token usage across providers.
Model Evaluation
iPassion AI Portal includes built-in tools for evaluating model quality:
- Arena Mode: Users can compare anonymous model responses and vote on which is better.
- A/B Testing: Run controlled comparisons between two models on the same prompts.
- ELO-based Leaderboard: Models are ranked using an ELO rating system based on user votes, providing a data-driven view of which models perform best for your organization's use cases.
iPassion AI Portal is a product of iPassion Co., Ltd.