Getting Started
First Login

Important
The first account created on a fresh installation automatically receives Admin privileges. Make sure the intended administrator creates their account first.
Steps
- Open a web browser (Google Chrome or Microsoft Edge recommended).
- Navigate to the iPassion AI Portal URL provided by your system administrator.
- On the sign-in page, click Sign up to create your account (or Sign in if an account has already been created for you).
- Enter your Name, Email, and Password, then submit.
- You will be signed in and taken to the main chat interface.
Note
- After the first admin account is created, subsequent registrations default to Pending status until approved by an Admin (configurable).
- If you are signing in to an existing deployment, enter your Email and Password and click Sign in.
- If you forgot your password, contact your system administrator for a reset.
Main Interface
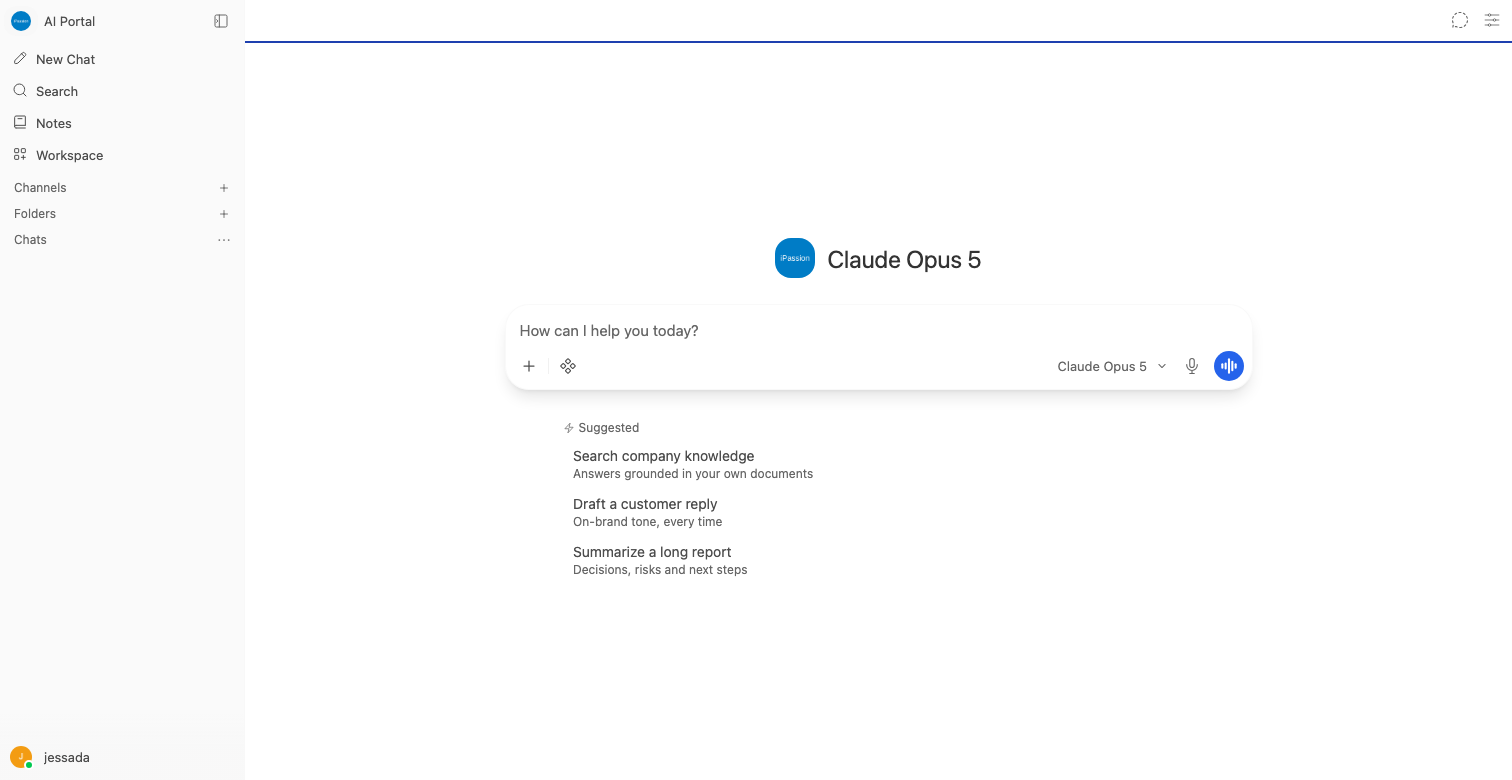
After successful login, you will see the main chat interface consisting of:
Left Sidebar
- New Chat button -- start a new conversation.
- Search -- search previous conversations by keyword.
- Conversation list -- all chat history, organized by date; drag conversations into folders, apply tags, or pin important ones to the top.
- Workspace -- access Models (agents/presets), Knowledge, Prompts, Skills, and Tools from the workspace menu.
- Notes -- open the rich-text note editor.
- User menu -- personal settings, theme toggle (light/dark/system), and sign out.
Chat Area (Center)
- Model selector -- located at the top of the chat area; click to choose one or more models for the conversation.
- Greeting -- displays a welcome message when no conversation is active.
- Suggested prompts -- example questions shown on the empty chat screen to help you get started.
- Conversation messages -- the main area where your messages and AI responses appear.
- Message input -- at the bottom of the screen; type your question or instructions here.
Input Controls
- Paperclip icon -- upload documents, images, or other files for AI analysis.
- Gear icon -- configure a per-conversation System Prompt.
- Web search toggle -- enable real-time web search for the current message.
- Microphone icon -- voice input via speech-to-text.
- Send (arrow) button -- send the message (or press
Enter). - Call button -- start a voice call with the AI model.
Your First Conversation
Steps
- Click New Chat or select a model from the model selector at the top of the chat area.
- Type a question in the message input field, for example: "Hello, what can you help me with?"
- Click Send or press
Enter. - Wait for the AI to process and display its response.
- Continue the conversation with follow-up questions.
Tip
- You can ask questions in Thai or English.
- More specific questions yield more accurate and useful responses.
- Attach documents or images for the AI to analyze by clicking the + button.
- Use
Shift + Enterto insert a new line without sending the message. - Select multiple models to compare responses side by side.
- Type
/in the message input to quickly access saved prompts. - Type
#to reference a knowledge collection in your message. - Type
@to select an AI Agent.